SUMMARY: Apply customizable soft edges to photos and clip-art inside PowerPoint 2010 presentations.
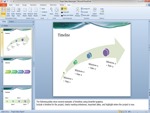 Instead of simply placing a picture inside a Microsoft PowerPoint 2010 presentation, one option for stylistic effect is to apply a soft edge. This makes the picture seem to fade to the background around the edges, a sometimes pleasing effect. See the below screenshot for an example.
1. Select an image to modify.
2. The “Format (Picture Tools)” tab appears in the Ribbon. Click it.
3. In the “Picture Styles” section, click the “Picture Effects” button.
4. A pull-down menu appears. Select “Soft Edges”.
5. From here you can choose to remove soft edges applied to a picture, or to apply a soft edge from 1 to 50 points (the greater the points, the larger the fade).
Applying a soft edge to a photo in a PowerPoint 2010 presentation
If you want to fine-tune the effect, click “Soft Edges Options” from the menu that appears. From here the “Format Picture” dialog box appears, showing “Glow and Soft Edges” options.
Underneath “Soft Edges”, either choose a preset by clicking the appropriate pull-down, or move the “Size” slider from 0 to 100 points. When done, click “Close” to close the dialog box.
Applying a 100-point soft edge to a photo in PowerPoint 2010